
Fiasco! is a GM-less improv game circa following the spirit of Coen Brothers movies about crazy people failing hard — or sometimes failing forward.
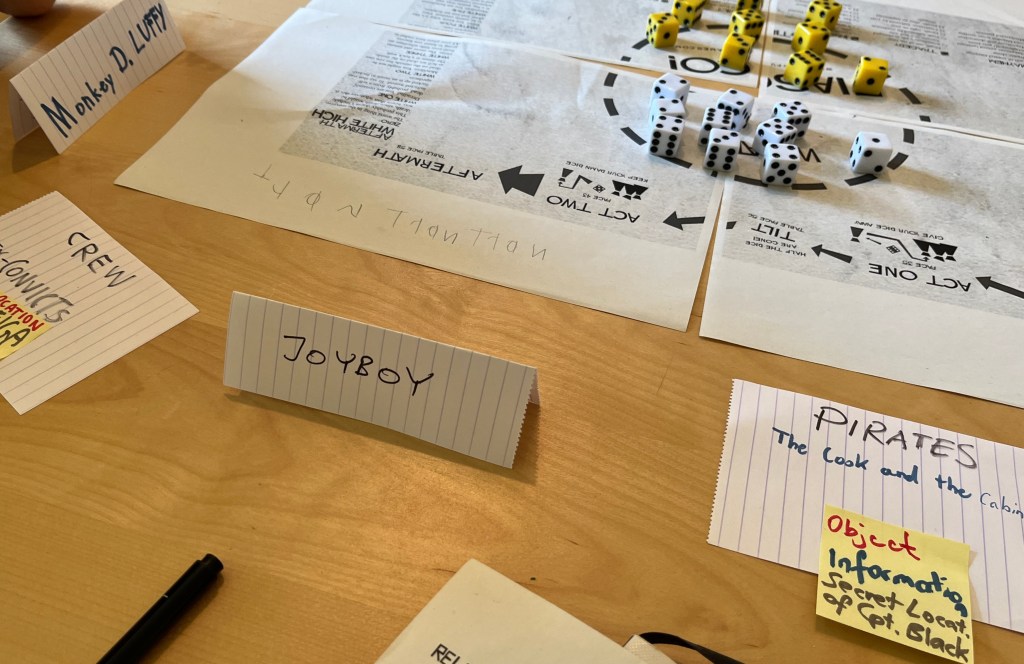
The system is built on a network of relationships and desperate needs, important objects and meaningful places, borrows many concepts from improv theater, and uses dice in two colours (in this case: lily-white for good, yellow for piss-poor) to signal negative or positive outcomes for scenes. These scenes are centered around particular characters. Generally, the goal of the game is that plans go wrong, characters suffer humiliation or even die … in Fiasco!, half the dice say a scene ends badly for the character in the spotlight, and that is plenty to wreck a career or three.
If you like “Fargo”, or “Burn After Reading”, or improv theater, you will likely love this game.
If you want your hero to win an epic triumph, you will not.
The particulars of an adventure setup are, in the absence of a Game Master, handled by “playsets”, essentially lists of relationships, needs, objects and places that orbit around a particular topic. Playsets exist about crime, about high society, about high school, about church, and, in our case, about Pirates. The actual mission or adventure evolves in the moment, out of the choices and ideas of the players.
I have played a session with this playset before … back then I played a French Pirate who lost several body parts to a hateful Spaniard and a crocodile but survived narrowly.
Now with different players and very different elements, a very different adventure:
Monkey D. Luffy – a question of style
One of the players was a big fan of the popular manga/anime One Piece about a near-invulnerable pirate called Monkey D. Luffy, so he wanted to play that guy, but in fact the characters are not built with attributes or special powers, they are defined by their relations to the other characters, and scenes are not resolved with skill-rolls, but by the choice of die-colour.
In retrospect we should have talked about intended style before the game, as the Luffy-player intended to actually play that rubber-flexible superpowered pirate, while the rest of us wrongly assumed that he would just borrow the name but play an actual human with bones.
Our characters
- Luffy had a sister, Miranda. Tied to them was an object, a ship carrying a lot of gold.
- Miranda was the protégé of the Admiral of the British Navy, David Prentiss, Third Earl of Sandwich, but she had an interesting need: She secretly coveted revenge against him: To doublecross a doublecrosser who took all her loot. Apparently he had tricked her out of a lot of money in the past… something he felt entitled to and didn’t even remember, while she held a murderous grudge.

- On his other side, Admiral Prentiss had a former crew member, “The cook”, with whom he shared the desire to unearth the hidden gold from an ancient Aztec city in the jungle.
Side note, that is two needs tied to one character — unusual, but possible. More than two needs make it a bit hard to keep a coherent narrative going, so this means all of the motivations in play were focused on the Admiral. Does that mean he is the main character? We shall see how the game evolves.

- The cook was crew member with a cabin boy [hello Long John Silver and Jim Hawkins!] and tied to them was the secret of the location of the secret hide-out of Captain Black. That cabin boy was played by myself, and to vibe well with Monkey D. Luffy I named him Joyboy, after another One Piece character.
- Joyboy and Luffy were crewmates, and tied to them was an object: a lost dutch merchantman in Tortuga. We wilfully misread “merchantman” as “merchant”, making it an NPC instead of a ship.
And so we have our ring of relationships tying them all together.
Loose lips sink ships
Act 1 started with Joyboy and Luffy wandering about in Tortuga and meeting a confused Dutchman called Johan Michel Voorhees, who had fallen asleep drunk aboard his ship and woke up alone in Tortuga. Good kids that we were we promised to return him to the first fellow Dutch crew we would meet and took him with us onto our own ship, where the cook made him drunk again and learned from him the secret of Captain Black’s hideout: apparently the Dutch had secret trade relations with Captain Black. Good to know. The cook told Joyboy in secret, and Joyboy immediately blabbed it to Luffy.
Our ship left Tortuga and made good wind, but soon happened upon a warship of the British Navy. Luffy outmaneuvered them and fled on our faster vessel, and soon left them behind. What we did not know was that the English notified their admiralty and Admiral Prentiss decided to intercept and shadow our ship, hoping to uncover our plans and round up some pirates.
The Admiral headed this expedition in person, and he had his protégé Miranda with him. Never did he suspect that she plotted his downfall all the while, but took her sweet time for it. “Revenge”, as she said, “is best served cold and savored slowly while the deadly point is delivered.”
She soon suspected that the pirate ship they were chasing was helmed by her crazy brother, but chose to play this information close to her chest as well — one more arrow to use when the time would be right.
Not knowing about the carefully shadowing warships, the cook showed Joyboy the maps of a sunken Aztec city, and told him that with the guns and manpower of Captain Black it might be possible to overcome the dangerous traps and unearth the gold of the Aztecs… but what then? The map was property of a pampered rich bastard, and he would inform that rich guy about our expedition with Black, hoping to pit Black and the rich guy against each other for some drama that may allow us to escape with the loot. That would need some clever timing and manipulation, so Joyboy volunteered to go undercover with Black’s crew to speed up or hinder the pirates as the situation demanded.
Sailship Shenanigans
At this point Luffy noticed masts at the horizon and discovered the British warships trailing us. He fled them and with some clever navigating ran circles around the secret island of Captain Black and hide in a bay there. Alas, the not so subtle move was observed in full by the baffled British. The Admiral decided that he had enough of these antics, and to board this weird ship, take prisoners, loot it and sink the rest.
Luffy and Joyboy left Master Voorhees with the cook and the crew on the ship and landed on the island. They sought out the secret cave of Captain Black. They gushed about him like fanboys, but the pirates’ keen lookouts spotted the British zeroing in on the island and took us prisoner, angry that we had burned their carefully camouflaged base.
About at that time the British fired a volley from their cannons and boarded our vessel. There was practically no resistance against the overwhelming force of the Royals. The Admiral himself recognized the cook as his old cook who had made off with the map of the Aztec city. He was very pleased to find it again, adorned with fresh markings and calculations that led to its precise location, and he ordered the cook to be taken aboard the admiral’s flagship. “We shall set sail towards these coordinates and find this old Aztec metropolis!”
The cook quickly collected essential notes and threw them overboard in a bottle for Joyboy and Luffy, ere our trusty old ship was set ablaze and sunk.
End of Act 1, Tilt Elements:
In the middle of a game, two players are determined who decide on two tilt elements, new instability to make sure that Act 2 would go off the rails.
They chose:
“Greed leads to killing” and “You thought it was taken care of, but it wasn’t”

After a short break we returned for Act 2.
Sharks, Spiders, and Snakes
Joyboy still tried to talk Captain Black into helping us and blabbed out every secret he knew, including how we got here — Johan the drunk secret-spiller — and about the map of the Aztec city. Captain Black’s lookouts identified the British flagship and he had a personal beef with Admiral Prentiss, so he gave us prisoners a choice: come with as captives to get zero gold, but possibly our lives, or get thrown to the sharks. Joyboy chose captivity, while Luffy chose the sharks. Our young hero got tossed into the shark pool, while the rest of the pirates grabbed Joyboy and decided to watch the course of the Brits and follow them.
At this point the afore-mentioned divergence in style became apparent: rubber-boy in a shark pool is very different from normal human in shark pool.
Miranda had [Tilt element “Failure”!] seen the message in the bottle and retrieved it. She used the contents to blackmail the Cook into helping her. Together the two ironed out a plan how to let the British retrieve the gold, then poison them and get away with the gold, and making sure to let the Admiral live long enough so he would die knowing it was Miranda who got her sweet revenge and had gotten the better of him.
The Admiral informed Port Royal about taking a part of the fleet to sail southwards on a special mission. He failed to notice the flotilla of Captain Black on his tails, sailed on for more than a week and finally reached the coast he sought. He took most of the captured pirates and the cook with him but left Master Voorhees with the skeleton crew at his ships. Then he let the cook plot the path and callously sent the captives in front to run into the Aztec’s defenses.
Heat Illness & Half-baked ideas
The cook felt helpless, cut off from his friends, blackmailed, alone, and slowly slid into an ever worsening state of depression.
Why had he not heard from anyone he could trust?
On the ships of the pirate fleet, his friend Joyboy had kissed ass and tried to establish himself as a good aide, giving hints and helpful advice all the time. But as soon as he got the opportunity he tried to signal the cook with a hooded lantern to let him know that Captain Black’s ships were near. A foolish idea that deserved to fail:
He suddenly heard a deep rumbling basso behind him: “That would be better visible from the mast top.”
“Oh, swell idea, thank you!” Joyboy turned around to face the Captain and four of his most trusted aides, all with sabers bared and angry stares.
“Ohm, uhm, it is not what it looks like…”
He was caught in the attempt to betray the pirates.
They put him in heavy irons and thrown into the brigg. Good bye, Joyboy!
Meanwhile, back on the island, Luffy had managed to survive the sharks — the player argued with the narrative of the anime, where sharks cannot hurt him because he has a rubber-like physical body. Be that as it may: He was all alone on a hidden island, with the ship sunk in a bay and the pirate fleet gone to hunt the British Admiral on his Aztec quest. In an attempt to cut down trees and build a raft, he even managed to set fire to the woods and start a forest fire that would go on to consume the whole of the island. Good bye, Luffy!
Corporal Pool
Miranda and the Cook discussed their plans to poison the British and dress up the Cook as Admiral to trick the Skeleton crew and commandeer a warship. Alas! They were overheard by a stalwart British Marine going by the name of Corporal Pool [impromptu NPC, a picture book 200% loyal hypercorrect British Empire man]. He immediately notified the Admiral and got a special task: He was to keep eyes on Miranda and the Cook 24/7 with a detachment of his personal choosing. The Admiral was not to be played for a fool, but nor was he to act rashly and waste his navigator to ancient Aztec treasures. Corporal Pool saluted smartly and went to work; and life for Miranda and the Cook became quite difficult.
Finally the expedition reached the lost Aztec city and the unlucky captive pirates were wasted, pushed forward on the bayonets of implacable British Marines to trigger and invalidate the ancient Aztec defenses.
Seeing his friends die and finally finding a hidden trove of riches, the Cook snapped. [Tilt Element: Greed leads to Killing] Heat, stress, depression and the oppressive atmosphere proved to much for him. He threw himself into the gold to grab it with bare hands, but he fell to the last Aztec poisoned spear trap before he could fully comprehend the folly of his action.
End of Act 2,
Aftermath:
In the Aftermath, every player rolls the dice that got assigned to every character during the course of the game and uses those to narrate a finish that may follow logically out of the game, but may also serve up a surprise twist.
According to the dice:
- Joyboy got such a surprise ending: He came out smelling like roses, hale and healthy. How did that happen?
- The Cook died but got discovered two centuries later. His skeleton was brought to the United States and later even to Great Britain where it was displayed in a museum: his death would enter history books.
- By the decree of the dice, Monkey D. Luffy also died, but we decided to just leave him stranded on that island, as death did not really fit the character concept of an elastic Anime-boy. In a Schrödinger fashion, he was just shelved in a box and his fate left to the personal preference of the individual spectator.
- The Admiral and Miranda would both survive with some blessures.
- And what about Captain Black?
So to finish the story properly:
As Miranda’s ploy against the Admiral was uncovered despite her playing the long game with so much diligence, and her execution deep in the jungle was imminent, Captain Black and his pirates broke out of the underbrush to attack and kill all of the British Royal Navy present. So in the chaos of a pitched battle deep in the hostile jungle, Miranda and the Admiral were forced to fight back to back one last time, between angry jibes at each other. Finally the pirate captain himself stormed at them like a bull and they both had to expend the bullets they had saved for each other to bring down the titanic foe.
The Admiral had suffered a wound in the battle and Corporal Pool — winning hearts and minds as favourite NPC at the table in record time — dashed to him to shoulder him and carry him off the field.
The surviving Marines took what gold they could transport and returned to their ships fast, to get medical attention for the Admiral and other wounded. They sailed off with Johan Michel Voorhees … whatever became of him would remain a mystery.
Miranda took enough to make it interesting for the pirates in Black’s fleet and returned to the shore after them. She contacted them and negotiated a deal to retrieve all the gold and share it with Black’s men, who, leaderless after his death, were the first stepping stone for Miranda’s ascension to Pirate Queen. Who had no beef at all with Joyboy, which explains his happy ending.
Miranda vs Prentiss: Origin
All of these bits from the Aftermath now keep lots of loose ends dangling. They make the gaming session an origin story — quasi the pilot to a potentially longer series of adventures, setting up a multitude of clashes between the two mortal foes emerging from this quest: Miranda the Pirate Queen at the Head of the Pirate Fleets versus Admiral David Prentiss, Third Earl of Sandwich, corrupt Supreme Commander of the British Royal Navy [and his loyal aide Corporal Pool].
Forgotten Element:
As it happens in Fiasco!, sometimes an element remains unused. In this case the “Object: Lots of Gold, a Ship full of Tax money bound for Britain”. That is okay, although: Miranda offered that there could be a side story where she returns to the old hideout of Captain Black, rescues her brother Luffy from the burned and lonely island, and the two of them raid and loot the ship.
But that is an altogether different adventure.
